ブログ

割とコンピュータよりの情報をお届けします。

TakeMe

Windows 10で.NET FrameworkからSAPIを使って音声合成

WIndows 10ならCefsharpで音声合成が使えない場合にも,日本語音声合成がC#などから使える。

COMオブジェクトのMicrosoft Speech Object Libraryを参照に追加するとSpeechLib名前空間に読み込まれるのでそれを用いれば簡単に音声合成ができる。

遅延バインディングでも良いがコード補完などの機能が使えなくなるので開発の効率が大きく損なわれる。

例えば以下のようなコード

using System;
using System.Collections.Generic;
using System.ComponentModel;
using System.Data;
using System.Drawing;
using System.Linq;
using System.Text;
using System.Threading.Tasks;
using System.Windows.Forms;
using SpeechLib;

namespace VoiceTEST
{
    public partial class Form1 : Form
    {
        public Form1()
        {
            InitializeComponent();

            SpVoice sp = new SpeechLib.SpVoice();
            sp.Speak("テスト");
        }
    }
}

Windows 10なら音声合成使えるのに...

≫ 続きを読む

2018/06/22 コンピュータ   TakeMe

Electronなら音声合成ができるようだ

Cefsharpで音声合成ができなかったようだったのでいろいろ調べていたらElectronならできそう。

参考ページを見て追加で,以下のコードを<body>内にある<script>の中に入れて様子を見ていると,読み上げができている。

var synthes = new SpeechSynthesisUtterance();
synthes.text  = 'こんにちは';
synthes.rate  = 1.0; 
synthes.pitch = 1.0;  
synthes.lang  = "ja-JP"; 
speechSynthesis.speak(synthes);

ElectronはCEFでなかったかな?

なかなかわからない。
もちろんC#でもWindows 10であればSAPIを使用して音声合成できるようなので問題ないのだが,幾分Windows 7を使っているユーザがいるのでCEFの側でできていたら良いなぁと思っていたが ...

もう少し検討が必要だ。

≫ 続きを読む

2018/06/22 コンピュータ   TakeMe

GeckoFX45.64の仕様?

CefSharpで音声合成が使えなかったので他の方法を探っている途中で見つけた仕様。

NuGetでGeckofx45.64 バージョン45.0.34パッケージをインストールして以下のようなコードを書いてみたところ,どうもうまくいかなかった。そもそも起動しない。

using Gecko;

namespace GeckoFXTest
{
    public partial class Form1 : Form
    {
        private GeckoWebBrowser geckoWebBrowser;
        public Form1()
        {
            InitializeComponent();

            Xpcom.Initialize("Firefox64");
            geckoWebBrowser = new GeckoWebBrowser { Dock = DockStyle.Fill };
            this.Controls.Add(geckoWebBrowser);
            geckoWebBrowser.Dock = DockStyle.Fill;
        }

        private void Form1_Load(object sender, EventArgs e)
        {
            geckoWebBrowser.Navigate("file:///C:/GeckoFXTest/html-resources/html/index.html");
        }
    }
}

パッケージインストールでできるFirefoxフォルダを実行ファイルのあるフォルダにFirefox64としてコピーしなければいけない仕様だった。

わかりにくい仕様だ(しかも標準では32ビット優先になっているから起動時にエラーが出てしまうので32ビット優先を解かなければならない)

ただGeckofx45も入れておけば起動時にx86とx64を切り替えられそう(両方のフォルダをコピーしておいて起動時に切り替えできるか?)。

それは後にして,音声合成の方だがまず使い始めの標準的な設定では使えなかった。こちらも調査中

≫ 続きを読む

2018/06/22 コンピュータ   TakeMe

CefSharpで今のところできないこと

CefSharpはChromeではなくChromiumなので…

ChromeとChromiumの違いなのか以下のように音声合成をチャレンジしてみたが,今のところうまくいっていない。

Google Chromeでできることはたいていできると思っていたので残念。
(それともやり方があるのか?)

var synthes = new SpeechSynthesisUtterance();
synthes.text  = 'こんにちは';
synthes.rate  = 1.0; 
synthes.pitch = 1.0;  
synthes.lang  = "ja-JP"; 
speechSynthesis.speak(synthes);

もう少し回避策がないのか探ってみたいが,ChromiumのWindows用ではどうなっているのか確認してみるのが先かもしれない。
その方が,糸口が見つかるかもしれない。ちなみにChromium Portableでは声は出ていた(読み上げが行われる)。

(ところでGoogle Chromeなら以下で問題ないいろいろ探しているうちに上のようにコマンドが長くなっただけ)

var synthes = new SpeechSynthesisUtterance('こんにちは');
speechSynthesis.speak(synthes);

参考ページはこちら

≫ 続きを読む

2018/06/19 コンピュータ   TakeMe

WPF TextBoxへのDoubleのバインド

WPF TextBoxへのDoubleのバインドを行ってみた。

TextBoxにDoubleをバインドしておく。もしエンターキーを押されるとNaNにしてしまう細工を追加。

MainWindow.xaml

<window height="100" mc:ignorable="d" title="MainWindow" width="800" x:class="TextBoxAndDouble.MainWindow" xmlns="http://schemas.microsoft.com/winfx/2006/xaml/presentation" xmlns:d="http://schemas.microsoft.com/expression/blend/2008" xmlns:local="clr-namespace:TextBoxAndDouble" xmlns:mc="http://schemas.openxmlformats.org/markup-compatibility/2006" xmlns:x="http://schemas.microsoft.com/winfx/2006/xaml">
    <grid>
        <viewbox>
            <textbox fontsize="34" keyup="TestKeyUp" text="{Binding Value, Mode=TwoWay, StringFormat=\{0:0.000\}, UpdateSourceTrigger=PropertyChanged, ValidatesOnNotifyDataErrors=False}" textalignment="Right" textwrapping="Wrap" width="800">
        </textbox></viewbox>
    </grid>
</window>

MainWindow.xaml.cs

using System;
using System.Collections.Generic;
using System.Linq;
using System.Text;
using System.Threading.Tasks;
using System.Windows;
using System.Windows.Controls;
using System.Windows.Data;
using System.Windows.Documents;
using System.Windows.Input;
using System.Windows.Media;
using System.Windows.Media.Imaging;
using System.Windows.Navigation;
using System.Windows.Shapes;

namespace TextBoxAndDouble
{
    /// <summary>
    /// MainWindow.xaml の相互作用ロジック
    /// </summary>
    public partial class MainWindow : Window
    {
        public MainWindow()
        {
            InitializeComponent();
            MainWindowsViewModel mainWindowsViewModel = new MainWindowsViewModel();
            this.DataContext = mainWindowsViewModel;
        }

        private void TestKeyUp(object sender, KeyEventArgs e)
        {
            TextBox textBox = (TextBox)sender;
            if (e.Key == Key.Return)
            {
                
                ((MainWindowsViewModel)this.DataContext).Value = Double.NaN;
            }
        }
    }
}

MainWindowsViewModel.cs

using System;
using System.Collections.Generic;
using System.Linq;
using System.Text;
using System.Threading.Tasks;
using System.ComponentModel;

namespace TextBoxAndDouble
{
    class MainWindowsViewModel : INotifyPropertyChanged
    {
        public event PropertyChangedEventHandler PropertyChanged;
        private void RaisePropertyChanged(string propertyName)
        {
            if (PropertyChanged != null)
                PropertyChanged(this, new PropertyChangedEventArgs(propertyName));
        }

        private Double _value = 0.0;
        public Double Value
        {
            set
            {
                _value = value;
                RaisePropertyChanged("Value");
            }
            get
            {
                return _value;
            }

        }
    }
}

≫ 続きを読む

2018/06/18   TakeMe

CefSharp.Wpfの使用例(その後)

前の記事でとりあえ起動まではいったがCEFの.NETとJavaScriptの呼び出し合いを引き続き確認していた。

とりあえずブラウザで表示させるコンテンツを作成した。
html-resourcesというフォルダを作成してコンテンツとしてビルドしたらコピーされるように設定した。(Basercmsの都合で左が切れてしまっている)
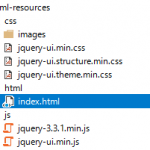
html-resources.png

index.htmlは以下のようにした。

<html>
<head>
<link type="text/css" rel="stylesheet" href="../css/jquery-ui.min.css" />
<script type="text/javascript" src="../js/jquery-3.3.1.min.js"></script>
<script type="text/javascript" src="../js/jquery-ui.min.js"></script>
<style>
#progressbar {
    margin-top: 10px;
    margin-bottom: 10px;
}
.ui-progressbar {
    position: relative;
}
.progress-label {
    position: absolute;
    left: 50%;
    top: 4px;
    font-weight: bold;
    font-size:22px;
    text-shadow: 1px 1px 0 #fff;
}
</style>
<script>
    var progress = 0;
    $(function() {
        $("#progressbar").progressbar({
            value: 0,
            max: 1024
        });

        $("#btn1").click(function() {
            cefCustomObject.text("CefSharp sample UI");
        });

        $("#btn2").click(function() {
            cefCustomObject.close();
        });
    });
</script>
</head>
<body style="background-color:transparent;">
<h1 style="font-family:Arial">TEST GUI SAMPLE</h1>
<div>
<button id="btn1" class="ui-button ui-widget ui-corner-all">Set Title</button>
<button id="btn2" class="ui-button ui-widget ui-corner-all">Close</button>
</div>
<div id="progressbar"><div id="label" class="progress-label"></div></div>
</body>
</html>

そのうえでMainWIndow.xaml.csは以下のようにする。
これで定期的にJavaScript側のprogressという変数はcount % 1024に置き換えられ,progressbarの更新が行われる。

using System;
using System.Collections.Generic;
using System.Linq;
using System.Text;
using System.Threading.Tasks;
using System.Windows;
using System.Windows.Controls;
using System.Windows.Data;
using System.Windows.Documents;
using System.Windows.Input;
using System.Windows.Media;
using System.Windows.Media.Imaging;
using System.Windows.Navigation;
using System.Windows.Shapes;
using CefSharp;
using CefSharp.Wpf;
using System.Windows.Threading;

namespace WPFwebui
{
    public partial class MainWindow : Window
    {
        // 実行ファイルのディレクトリ取得
        public string StartupPath {
            get {
                return System.IO.Path.GetDirectoryName(System.IO.Path.GetFullPath(Environment.GetCommandLineArgs()[0]));
            }
        }

        // Chrrmiumに見せるオブジェクト
        CefCustomObject exposedObj = null;

        CefSharp.Wpf.ChromiumWebBrowser browser;

        public MainWindow()
        {
            InitializeComponent();

            browser = new CefSharp.Wpf.ChromiumWebBrowser();
            // アドレスの取得
            String page = string.Format(@"{0}\html-resources\html\index.html", StartupPath);
            BrowserSettings browserSettings = new BrowserSettings();
            browserSettings.FileAccessFromFileUrls = CefState.Enabled;
            browserSettings.UniversalAccessFromFileUrls = CefState.Enabled;
            browser.BrowserSettings = browserSettings;
            // アドレス設定
            browser.Address = page;
            Content = browser;
            browser.Loaded += BrowserLoaded;

            // 例1: Chromiumに.NETオブジェクトを露出
            CefSharpSettings.LegacyJavascriptBindingEnabled = true;
            exposedObj = new CefCustomObject(browser, this);
            browser.RegisterJsObject("cefCustomObject", exposedObj);
        }

        // 例2: .NET から定期的にスクリプト実行の例(前半)
        private DispatcherTimer timer1 = null;
        void BrowserLoaded(object sender, EventArgs e)
        {
            timer1 = new DispatcherTimer(DispatcherPriority.Normal);
            timer1.Interval = new TimeSpan(0, 0, 0, 0, 100);
            timer1.Tick += new EventHandler(Timer1_Tick);
            timer1.Start();
        }

        //  .NET から定期的にスクリプト実行の例(後半)
        private Int64 count = 0;
        void Timer1_Tick(object sender, EventArgs e)
        {
            this.browser.ExecuteScriptAsync(
                "progress = " + count % 1024 + ";" +
                "$('#progressbar').progressbar({value: progress,max: 1024});" +
                "$('#label').html(progress);");
            count++;
        }
    }
}

例えばCef側に露出させる.NETオブジェクトの例は以下のようにする。

これでJavaScript側でボタン1を押すとtext()が実行されMainWindowのタイトルが変更される。ボタン2を押すとclose()が実行される。

using System;
using System.Collections.Generic;
using System.Linq;
using System.Text;
using System.Threading.Tasks;
using CefSharp;
using CefSharp.Wpf;
using System.Diagnostics;
using System.Windows;

namespace WPFwebui
{
    public class CefCustomObject
    {
        private static ChromiumWebBrowser _instanceBrowser = null;
        private Window _window = null;

        public CefCustomObject(ChromiumWebBrowser originalBrowser, Window window)
        {
            _instanceBrowser = originalBrowser;
            _window = window;
        }

        delegate void TextDelegate(string _text);
        public void text(string _text)
        {
            if (!_window.Dispatcher.CheckAccess())
            {
                _window.Dispatcher.Invoke(new TextDelegate(text), new object[]{ _text });
                return;
            }
            _window.Title = _text;
        }

        delegate void CloseDelegate();
        public void close()
        {
            if (!_window.Dispatcher.CheckAccess())
            {
                _window.Dispatcher.Invoke(new CloseDelegate(close));
                return;
            }
            _window.Close();
        }
    }
}

≫ 続きを読む

2018/06/17 コンピュータ   TakeMe

CefSharpでAnyCPU対応に苦慮した話3

WPFでもCefSharp使えるのではと試行錯誤した挙句,いろいろとはまった

NuGetでCefSharp.Wpfをインストールして。参考ページのように以下を追加してみる。

public partial class MainWindow : Window
{
    public MainWindow()
    {
        InitializeComponent();
        var browser = new CefSharp.Wpf.ChromiumWebBrowser();
        browser.Address = "https://google.co.jp";
        Content = browser;
    }
}

まあ,このコードはうまくはいかない。ソリューションプラットフォームをAny CPUにしているからかも。

と言うことでまた,例の手順の登場。
*.csprojファイルの最初のProperyGroupの末尾(</PropertyGroup>の前あたり)に

<CefSharpAnyCpuSupport>true</CefSharpAnyCpuSupport>

を追加してVisual Studioを再起動した。

さらに,別の参考ページでWPFアプリケーションのMainを編集する方法を確認する。
App.xamlをソリューション エクスプローラーで選択しておいて,プロパティのビルドアクションをPageに変更する。
この状態でApp.xaml.csに編集を加える。

例えば次のように変更を加える。

using System;
using System.Collections.Generic;
using System.Configuration;
using System.Data;
using System.Linq;
using System.Threading.Tasks;
using System.Windows;
using System.Reflection;
using System.IO;
using CefSharp;
using CefSharp.Wpf;

namespace WPFwebui
{
    /// 
    /// App.xaml の相互作用ロジック
    /// 
    public partial class App : Application
    {
        [STAThread]
        public static void Main()
        {
            AppDomain.CurrentDomain.AssemblyResolve += Resolver;
            InitializeChromium();

            App app = new App();
            app.InitializeComponent();
            app.Run();
        }

        private static Assembly Resolver(object sender, ResolveEventArgs args)
        {
            if (args.Name.StartsWith("CefSharp"))
            {
                string assemblyName = args.Name.Split(new[] { ',' }, 2)[0] + ".dll";
                string archSpecificPath = Path.Combine(AppDomain.CurrentDomain.SetupInformation.ApplicationBase,
                                                       Environment.Is64BitProcess ? "x64" : "x86",
                                                       assemblyName);

                return File.Exists(archSpecificPath)
                           ? Assembly.LoadFile(archSpecificPath)
                           : null;
            }

            return null;
        }

        private static void InitializeChromium()
        {
            CefSettings settings = new CefSettings();
            settings.BrowserSubprocessPath = Path.Combine(AppDomain.CurrentDomain.SetupInformation.ApplicationBase,
                                                   Environment.Is64BitProcess ? "x64" : "x86",
                                                   "CefSharp.BrowserSubprocess.exe");
            Cef.Initialize(settings, performDependencyCheck: false, browserProcessHandler: null);
        }
    }
}

一応動いた?

≫ 続きを読む

2018/06/16 コンピュータ   TakeMe

WPF フォーカスが当たったらForeground Backgroundを変更するTextBox

WPF
 フォーカスが当たったらForeground Backgroundを変更するTextBoxを作るのに苦労した。

XAMLは知っている人にとっては便利かと思われるが,
やりかたを試行錯誤するとこ4時間。

非常に苦労した。

フォーカスが当たると
Foreground
Backgroundを変更するTextBoxのスタイル例。

<Window.Resources>
    <Style x:Key="test" TargetType="{x:Type TextBox}">
        <Style.Triggers>
            <Trigger Property="IsFocused" Value="true">
                <Setter Property="Foreground" Value="Red"/>
                <Setter Property="Background" Value="Black"/>
            </Trigger>
        </Style.Triggers>
    </Style>
<Window.Resources>

<TextBox Grid.Row="2" Style="{StaticResource test}" HorizontalAlignment="Right" Text="2093j" FontSize="30"></TextBox>

≫ 続きを読む

2018/06/13   TakeMe

WPF TextBoxのControlTemplateの設定難しい

WPFのTextBoxのControlTemplateは一部だけいれてOverridesDefaultStyleできるのかと思っていた。

WPFのTextBoxのControlTemplateは一部だけいれてOverridesDefaultStyleを記述してしまうとコントロールが消えてしまった。

マイクロソフトのページにはTextBox ControlTemplate の例があって,
「コントロールのビジュアル ツリーを変更するには、コントロールの Template プロパティをその新しい完全な ControlTemplate に設定する必要があります。」

XAMLはいったんきまるとWindows Formsより更新の不具合が少ないが,決まるまで難しい。(慣れていない)

≫ 続きを読む

2018/06/09 コンピュータ   TakeMe

jCanvasのイベントに苦労2

jCanvasのイベントの設定にまたはまってしまった。

普通にjCanvasではmouseoverなどのイベントが設定できるとあったのでまえのように
<script>
$('#image').drawRect({
  layer: true,
  fillStyle: '#000',
  x: 10, y: 100,
  width: 200,
  height: 100,
  fromCenter: false,
  mouseover: function(layer) {
    alert("test");
  }
});
</script>
とやって解決していたが,これが複数ある場合には,layer: trueを設定していないものがイベント後に消える被害が発生することがあった。
なんとも回避できなくて,すべての項目にlayerを設定する必要が出てくる。

≫ 続きを読む

2018/06/08 コンピュータ   TakeMe